An easy hole pattern, and an advanced beginner sewing pattern. 
Filed under: bookbinding, japanese stab binding, research


An easy hole pattern, and an advanced beginner sewing pattern.
A fairly straightforward beginning bind and hole pattern.

…or at least how I understand it. I’ve had many questions since I began posting my own Japanese stab bind designs: about how I create them, the thought process behind the designs and sewing mechanisms, the tools I use, etc. I’ll break down my personal process in another post; for this one I want to explain some of the basics for those of you just starting out in the world of bookbinding and are looking for a style that allows for incredible expression.
If you have researched bookbinding at all, you will have most likely come across the basic Japanese stab bind (JSB). It looks like this: four holes, four wraps around the spine, and a wrap around each edge.

Fold line
The most import part of the traditional JSB to remember is what I call the ‘fold line’. This is made by the holes that are farthest away from the spine, or closest to the content on the inside of your book. It is vital that they be in a straight line, otherwise your book will end up with a crooked fold and the cover will be more likely to tear.

Having thread run along the fold line is helpful because it keeps the cover from tearing off as easily – there is more surface for the cover to bend against, instead of just single holes. It also keeps with the traditional JSB look. I’ve only sewn a handful of binds that didn’t have thread reinforcing the fold line, but the holes were even.
“Butterfly” bind.

Edges and spine
It isn’t absolutely necessary to include the edge wraps, but good practice to do so. If you have a tendency to sew loosely, or if you ever have trouble making your knot tight enough, it is important to include the edge wraps. They also help with reinforcing the fold line, and keep the book together better. The spine needs to always have some kind of wrap. As you can see from the example binds in this post, there are numerous ways to do this.
Holes
The absolute minium of necessary holes would be one hole…but you would end up with a fairly wobbly and shaky book and your design would be limited to a triangle. Two holes would still create a weak bind, but if the book were quite small, or had only a few pages, it would probably work. But good news: there is no maximum limit to how many holes your design can have, and it doesn’t matter if it is an even or an odd number. You are only limited by your patience, persistence, and stamina when it comes to drilling all of those holes! I would say my patterns have an average of 30 holes each.
“Crocus” has 53 holes.

**A potential problem area is how close your holes are to each other…the closer they are, the more likely your book block will rip when you pull the thread tight. And NOTHING is more disheartening than when that happens! I try to keep my holes at least .25″ (or 7 mm) apart. On occasion I will place them closer, but I then sew the book very, very carefully.
Process
This is where it gets a bit complicated to explain by using words and not physically demonstrating (maybe one day I’ll try to create a video tutorial).
The traditional JSB with 4 holes has the sewing start at hole #2. But if you have a complicated design, it’s easier to start at the very edge. The central objective of JSB is to sew your entire bind while never repeating the same line; in other words, never having two threads between the same two holes.

To achieve this, you essentially sew half of the design in one direction, then at the halfway mark you return back to the start by sewing the pattern in reverse. You must get the concept “over-under-over-under”…then, “under-over-under-over” firmly in your mind. This is fairly easy to figure out on a geometric pattern – and it can become convoluted with an organic/non-geometric design very rapidly! The ease or difficulty is very much dependent on what the design is and who is sewing it.
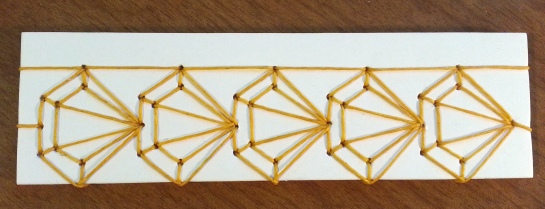
For example, below is “mushroom”, which is a geometric pattern with 5 repeats. The first ‘mushroom’ segment is completed before the second is begun. In fact, because of the gap between each segment, each mushroom is sewn exactly the same way. If they had been touching at the fold line, the needle direction of the second mushroom would have been completely opposite of the first (every ‘enter’ would become an ‘exit’). The third mushroom would have been like the first, the fourth like the second, etc.

In “peacock”, an organic pattern, the sewing starts in the middle, creating the feather’s rachis first, then the center circles, then the final circle with fringe coming off of it. It looks complicated, but once you have mastered the concept of ‘over-under-over under,’ it isn’t too difficult to figure out.

“Woven” is an exception to the rule: it is a geometric pattern, but the sewing actually goes from one side to the other and back again just to complete one ‘V’ shape. But the edges and the sides still use the ‘over-under-over-under’ approach.

======
Early in my experimenting I decided that straight perpendicular lines by themselves were boring. I figured out that the spine could be wrapped with a ‘V’ shape by crossing one loop with another previous loop (or loops). So far the only shape that seems impossible is a circle, but I’m working on it!
I hope this is helpful. If you ever run into a snag with your own pattern or design (or with one of mine) send me an email. And send pictures of your creations, I would love to see!

The maple leaf pattern tutorial, as requested in the poll! I’d say this one is pretty simple. The instructions for the ‘V’s at the edges are written differently than usual, but I hope it make it a bit easier.
*Tip: make holes 1, 14, and 26 a bit larger than the others, as the needle will have to go through them eight times.*
**click on an image to enlarge**
hole pattern

sewing pattern

EXIT = needle pointed DOWN and ENTER = needle pointed UP
=====
enter 1, leave a tail but don’t knot it
exit 2, wrap around right edge, exit 2 again
enter 1
exit 3
enter 1
exit 4
enter 1
exit 6
enter 1
exit 7
enter 1
exit 9
enter 1
exit 11
enter 1
exit 12
enter 11
exit 10
enter 9
exit 8, wrap around spine, exit 8 again
enter 7, wrap around spine
enter 6
exit 5, wrap around right edge, exit 5 again
wrap around spine, exit 5 again
enter 4, wrap around right edge
enter 3
exit 2
enter 3, wrap around right edge, thread needle through loop at edge, point up
enter 4
exit 5
enter 6, wrap around spine, thread needle through loop at edge, point right
enter 7
exit 8
enter 9
exit 10
enter 11
exit 12
enter 13
exit 14
enter 15
exit 14
enter 16
exit 14
enter 18
exit 14
enter 19
exit 14
enter 21
exit 14
enter 23
exit 14
enter 24
exit 23
enter 22
exit 21
enter 20, wrap around spine, enter 20 again
exit 19, wrap around spine
exit 18
enter 17, wrap around spine, enter 17 again
exit 16
enter 10
exit 15
enter 13
exit 15
enter 10
exit 16
enter 17
exit 18, wrap around spine, thread needle through loop at edge, point right
exit 19
enter 20
exit 21
enter 22
exit 23
enter 24
exit 25
enter 26
exit 27
enter 26
exit 28
enter 26
exit 30
enter 26
exit 31
enter 26
exit 33
enter 26
exit 34
enter 26
exit 35, wrap around left edge, exit 35 again
enter 34, wrap around left edge
enter 33
exit 32, wrap around left edge, exit 32 again
wrap around spine, exit 32 again
enter 31, wrap around spine
enter 30
exit 29, wrap around spine, exit 29 again
enter 28
exit 22
enter 27
exit 25
enter 27
exit 22
enter 28
exit 29
enter 30, wrap around spine, thread needle through loop at edge, point right
enter 31
exit 32
enter 33, wrap around left edge, thread needle through loop at edge, point down
enter 34
exit 35
enter 26
exit 25
enter 24
exit 14
enter 13
exit 12, tie off
I seem to have a backlog of patterns I have sketched but not sewn yet…lately I’ve been playing with triangles. Here are a couple:
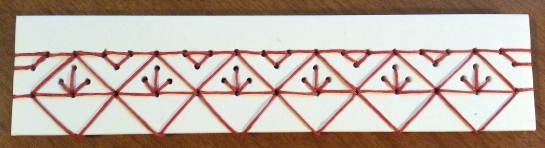
“Tiara”… 28 holes. Beginner bind.

“Double arrows”…48 holes. Beginner bind.

 Second place in the tutorial poll. A very simple bind, no twists or complicated V shapes. 58 total holes. If you’d rather have cinnamon rolls instead of sushi, ignore the steps marked with an asterisk “*”.
**click any image to enlarge**
hole pattern

sewing pattern

EXIT = needle pointed DOWN and ENTER = needle pointed UP
=====
enter 1, leave a tail but don’t knot it, wrap around right edge, enter 1 again
exit 2, wrap around spine, exit 2 again
enter 3
exit 4
enter 5
exit 6
enter 5
exit 4
enter 3
exit 2
enter 1
exit 7
enter 8
exit 9
enter 10
exit 11
enter 12
exit 13
enter 14
exit 15
enter 16
exit 17
enter 18
exit 19
enter 20
*exit 16
*enter 20
exit 19
enter 18
exit 17
enter 16
exit 15
enter 14
exit 13
enter 12
exit 11
enter 10
exit 9
enter 8
exit 7
enter 6
exit 21
enter 5, wrap around spine, enter 5 again
exit 22
enter 23
exit 24
enter 25
exit 24
enter 23
exit 22
enter 5
exit 21
enter 26
exit 27
enter 28
exit 29
enter 30
exit 31
enter 32
exit 33
enter 34
exit 35
enter 36
exit 37
enter 38
exit 39
*enter 35
*exit 39
enter 38
exit 37
enter 36
exit 35
enter 34
exit 33
enter 32
exit 31
enter 30
exit 29
enter 28
exit 27
enter 26
exit 25
enter 40
exit 24, wrap around spine, exit 24 again
enter 41
exit 42
enter 43, wrap around spine, enter 43 again
exit 44, wrap around left edge, exit 44 again
enter 43
exit 42
enter 41
exit 24
enter 40
exit 45
enter 46
exit 47
enter 48
exit 49
enter 50
exit 51
enter 52
exit 53
enter 54
exit 55
enter 56
exit 57
enter 58
*exit 54
*enter 58
exit 57
enter 56
exit 55
enter 54
exit 53
enter 52
exit 51
enter 50
exit 49
enter 48
exit 47
enter 46
exit 45
enter 44
exit 45
enter 40
exit 25
enter 26
exit 21
enter 6
exit 7, tie off
 This is a beginning bind, with an intermediate level of holes (40). If you don’t want the gaps between the hearts, then repeat the steps marked in orange until you have the desired number. When you have reached the end of your line of hearts, wrap the left edge, then work your way back to the beginning through the middle of the hearts repeating the steps in blue. Be aware though, you will have to adjust the hole pattern. If you get completely lost, leave a comment with your question and I will try to answer it.
**click on an image to enlarge**
hole pattern

sewing pattern

EXIT = needle pointed DOWN and ENTER = needle pointed UP
=====
enter 1 (leave a tail but don’t knot it), wrap around right edge,
enter 1 again
exit 2
enter 3
exit 4
enter 5
exit 6
enter 7
exit 6
enter 5
exit 4
enter 3
exit 2
enter 1, wrap around spine at angle to below 9,
enter 1 again
exit 8
enter 9
exit 10
enter 7, wrap around spine, thread needle through loop from 1, point right,
enter 7 again
exit 11
enter 12
exit 13
enter 14
exit 15
enter 16
exit 17
enter 16
exit 15
enter 14
exit 13
enter 12
exit 11, wrap around spine at angle to below 19,
exit 11 again
enter 18
exit 19
enter 20
exit 17, wrap around spine, thread needle through loop from 11, point right,
exit 17
enter 21
exit 22
enter 23
exit 24
enter 25
exit 26
enter 27
exit 26
enter 25
exit 24
enter 23
exit 22
enter 21, wrap around spine at angle to below 29,
enter 21 again
exit 28
enter 29
exit 30
enter 27, wrap around spice, thread needle through loop from 21, point right,
enter 27 again
exit 31
enter 32
exit 33
enter 34
exit 35
enter 36
exit 37
enter 36
exit 35
enter 34
exit 33
enter 32
exit 31, wrap around spine at angle to below 39,
exit 31 again
enter 38
exit 39
enter 40
exit 37, wrap around spine, thread needle through loop from 31, point right,
exit 37 again
wrap around left edge, exit 37 again
enter 40
exit 39
enter 38
exit 31
enter 27
exit 30
enter 29
exit 28
enter 21
exit 17
enter 20
exit 19
enter 18
exit 11
enter 7
exit 10
enter 9
exit 8, tie off
“Diamond gems”, with five repeats instead of four because I’m a rebel. 46 holes. Could be fun with sparkly thread on a dark background! Intermediate, I’d say.
I named this one ‘fair isle’ because I’m very into knitting these days, and have tried a few stranded color-work projects. I think the Fair Isle knitting technique is more than I want to attempt just yet. But this was super easy! Anyway, 56 holes and mid-advanced beginner.

The lotus blossom or lily-pad flower, whichever. 36 total holes, about an intermediate bind. Make sure that your holes along the top line are even! As always, if there is an error or if you have a question, leave a comment and I will do my best to answer.
**click on an image to enlarge**
hole pattern

sewing pattern

EXIT = needle pointed DOWN and ENTER = needle pointed UP
=====
enter 1, (leave a tail but don’t knot it), wrap around right edge, enter 1 again
exit 3
enter 4, wrap around right edge, enter 4 again
exit 5
enter 6, wrap around right edge, enter 6 again
exit 7, wrap around right edge, exit 7 again
wrap around spine at angle to below 5, exit 7 again
enter 6
exit 5
enter 8
exit 5
enter 4
exit 3
enter 8
exit 3
enter 1
exit 2
enter 9
exit 10
enter 11
exit 12
enter 11
exit 10
enter 13
exit 14
enter 2
exit 14
enter 8
exit 14
enter 15, wrap around spine through loop from 7, point right, enter 15 again
wrap around spine, enter 16
wrap around spine through loop from 15, point left, enter 15
exit 14
enter 16, wrap around spine, enter 17
wrap around spine through loop from 16, point left, enter 16
exit 14
enter 17, wrap around spine, enter 25
wrap around spine through loop from 17, point left, enter 17
exit 14
enter 13
exit 12
enter 19
exit 14
enter 19
exit 17
enter 18
exit 25
enter 18
exit 17
enter 19
exit 18
enter 19
exit 25
enter 19
exit 24
enter 19
exit 20
enter 23
exit 24
enter 25, wrap around spine, enter 26
wrap around spine through loop from 25, point left, enter 25
exit 24
enter 26, wrap around spine, enter 30
wrap around spine through loop from 26, point left, enter 26 again
exit 24
enter 30, wrap around spine at angle to below 34, enter 30 again
exit 24
enter 29
exit 32
enter 29
exit 34
enter 29
exit 24
enter 28
exit 24
enter 23
exit 22
enter 21
exit 20
enter 21
exit 22
enter 27
exit 28
enter 31
exit 32
enter 33
exit 34
enter 35
exit 36, wrap around spine through loop from 30, point right, exit 36 again
wrap around left edge, exit 36 again
enter 35, wrap around left edge, exit 35 again
exit 34
enter 33, wrap around left edge, enter 33 again
exit 32
enter 31, wrap around left edge, enter 31 again
exit 28
enter 27
exit 22
enter 23
exit 20
enter 19
exit 12
enter 13
exit 10
enter 9
exit 2, tie off
I named this bind ‘centerpiece’ because it reminds me of a watch, especially since there are 12 holes that make up the circle. But it could be fun to have a monogram or single letter placed in the center of the circle!
This is probably an intermediate bind. 38 holes.


I have a backlog of patterns I’ve sewn and photographed, yet not had time to post. This bind continues on the circle theme. 64 holes, pretty straightforward sewing. Advanced beginner?

I thought about naming this drunken triangles or dizzy triangles. It’s pretty straightforward, especially with only 31 holes to punch.


Hello world! I still exist!
I have been thinking about the various stab binding patterns that I have posted over the years, and how many of you who have found my blog would love to have tutorials for more of them. However, my time is limited and I have been trying to figure out the best way of doing this, that would help generate my family a little extra income. There are a lot of ways I could do this, by creating pdfs of the tutorials that could be purchased and downloaded for a small price (around $8-10 US), or by starting a YouTube channel with free patterns (the more simple ones), and then a members-only section that would have access to paid patterns (the more elaborate ones).
Please fill out the form below to tell me what you prefer!
I would possibly still post previews here on this blog about content elsewhere, and if I come up with a new pattern, I would post that as well.
For me personally, I like the idea of a Youtube channel because of the possibility of a community forum, where you could talk with me and ask for specific designs, as well as motivate me because nothing helps an artist continue like people who are interested in her work! :)
Thanks for sticking with me, even after a 4 year absence!
Well, December, January, and February saw my family buying a house, renovating a house, and moving into a house…and then the long task of unpacking and getting settled! There’s only a few boxes left and I now have the mental space to get going with tutorials.
Wow, what a response to my poll in the last post! Thank you so much for all of the encouragement. Looking now at my past stab binding experiments, there are a lot. So I thought it might be fun to have another poll, and see what you guys would like to learn first.
One of these four designs is what I’m considering starting with:
I tried to pick a few designs that weren’t too simple, but also not too crazy complicated in terms of number of holes (I’m looking at you, “Elephants”, with 96 holes!). Tell me which one you’d like to learn how to sew! I will be using Gumroad to upload the pdfs. I am also going to be publishing under the channel ‘Loops and Sparks’ instead of Becca Making Faces, but I’ll be leaving this blog the same.
Let me know in the comments if there is a different pattern you are really hoping to see!
It’s live! The first pdf tutorial I have created can be found in two places, on Gumroad: https://loopsandsparks.gumroad.com/l/notched and on Etsy: https://www.etsy.com/listing/1722741648/japanese-stab-binding-tutorial-notched
I did my best to improve upon the other tutorials I have listed in past years on this blog. Each pattern tutorial I list for sale will have at least two full sets of instructions on two different sizes of bind. For instance, Notched only works with a 6″ long spine, but I added a second version that is almost 8″. Other patterns will have more room to shrink or expand the design, but Notched isn’t one of them. I’ve also had the patterns tested for errors/clarity, but if you think you have found an error or something doesn’t make sense, please send me an email!
I’m working on the pdf tutorial for Stars now, and I am trying to figure out all the bits and pieces I need to record the video for Notched. But I have questions.
Those of you who want to watch a video on YouTube, do you
1) want voice over (explaining what I’m doing),
2) prefer an ASMR style with no talking but sound of the sewing, with captions explaining what I’m doing?
I’m leaning more toward option #2, but tell me in the comments what you think. If you aren’t a native English speaker, tell me which option is easier for you! I will not have music in my videos, as I find it distracting myself and it would add an extra layer of complexity.
If there’s something else about a video you are really hoping for, let me know so I can plan for it! Now that I have set up the first pdf, others should be posted more quickly than this one. I dithered a lot, sorry about that.


